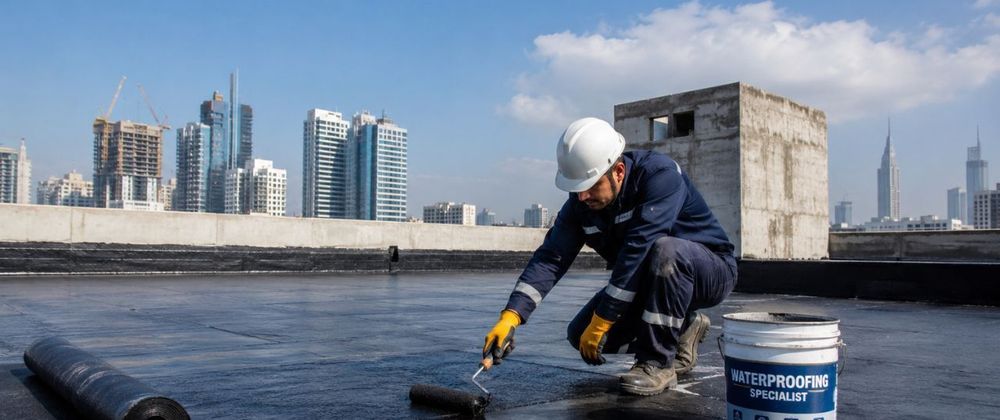
A professional waterproofing specialist can identify roof defects before moisture causes extensive damage. Allseal Waterproofing PTE Ltd helps property owners assess common leakage problems and determine suitable solutions based on the roof material, drainage condition, surface stability, and suspected water-entry point.
Why Roof Leakage Requires Professional Attention
A leaking roof can affect much more than the surface directly exposed to rain. Water may enter through a small crack or failed joint and then move through concrete, insulation, ceiling spaces, walls, and electrical areas.
The first visible symptom may be a ceiling stain, peeling paint, musty odour, or damp upper-floor wall. However, the actual point of entry may be several metres away.
This hidden movement makes roof leakage difficult to diagnose without a careful inspection.
Temporary patching may reduce visible dripping for a short period. However, the leak can return when the repair does not address the actual source, surrounding damage, or drainage condition.
Professional roof waterproofing focuses on:
Identifying the water-entry point
Inspecting connected roof components
Repairing cracks and unstable areas
Correcting vulnerable joints
Improving drainage where necessary
Selecting a compatible waterproofing system
Testing the completed work
Providing practical maintenance guidance
Early assessment can help protect the building’s structure, finishes, equipment, and occupied spaces.
1. Cracks in Concrete Roof Surfaces
Concrete roof cracks are a common source of water intrusion.
Cracks may develop because of temperature changes, building movement, shrinkage, impact, ageing, or deterioration of the roof screed.
Not every crack presents the same level of risk. A hairline surface crack may require a different treatment from a wider or actively moving crack.
During an inspection, the contractor should assess:
Crack width
Crack depth
Crack direction
Surface movement
Moisture activity
Nearby joints
Previous repairs
Condition of the surrounding concrete
Simply applying a coating over the crack may not provide reliable protection.
The crack may first need to be cleaned, opened, filled, sealed, reinforced, or injected. The correct method depends on its condition and whether water is actively passing through it.
Where concrete has begun to break away, the repair may also need to follow suitable concrete repair principles before waterproofing begins.
2. Damaged or Aged Waterproofing Membranes
Roof membranes protect the building by creating a barrier against rainwater. Over time, they may become damaged by sunlight, weather exposure, movement, foot traffic, maintenance activities, or ageing.
Warning signs may include:
Blisters
Cracks
Peeling sections
Open seams
Surface bubbles
Discolouration
Loose membrane edges
Water stains below the roof
Repeated leakage after rainfall
A damaged membrane should be assessed across the surrounding area. Treating one visible defect may not be enough when the system has deteriorated more widely.
The contractor should determine whether the roof needs:
A local repair
Reinforcement of vulnerable sections
Partial membrane replacement
A compatible protective coating
A more complete waterproofing system
The existing material must also be identified where possible. New products should be compatible with the old membrane, primer, repair mortar, sealants, and roof substrate.
Allseal Waterproofing PTE Ltd can inspect visible membrane conditions and recommend an approach based on the extent of damage and the roof’s exposure.
3. Water Ponding on Flat Roofs
Flat roofs should still have enough slope to direct water toward drainage outlets.
When water remains in one area after rainfall, the condition is known as ponding. Standing water increases the time that membranes, coatings, joints, and cracks remain exposed to moisture.
Common causes of ponding include:
Blocked drains
Poor surface gradients
Sunken roof sections
Damaged screed
Debris accumulation
Incorrect outlet positioning
Uneven previous repairs
Structural movement
Ponding should not be treated only by applying another waterproof coating.
The underlying drainage issue must also be investigated. Otherwise, water may continue collecting in the same area and place stress on the new system.
Depending on the condition, the solution may involve:
Clearing drainage outlets
Repairing damaged screed
Correcting local roof levels
Improving water flow
Treating cracks
Installing a suitable membrane
Protecting vulnerable outlet connections
Regularly following roof drainage best practices can help reduce future blockages and standing-water problems.
4. Blocked or Defective Roof Drains
Roof drains play a critical role in removing rainwater.
When outlets become blocked by leaves, dirt, construction debris, or biological growth, water may accumulate and flow into weak areas.
Drainage defects can also occur when:
Connections are damaged
Outlet collars are poorly sealed
Pipes are cracked
Grates are missing
Drain locations are too high
Surrounding surfaces slope incorrectly
Sealants have deteriorated
A contractor should inspect the drain opening, surrounding membrane, pipe connection, and water-flow direction.
The waterproofing layer should connect correctly to the outlet. Gaps or weak transitions around the drain can allow water beneath the main membrane.
Cleaning alone may not solve the issue when the outlet connection or surrounding waterproofing detail has failed.
5. Failed Roof Joints and Sealants
Roofs contain many joints where different surfaces or materials meet.
These areas often include:
Parapet connections
Expansion joints
Roof edges
Flashing joints
Pipe penetrations
Equipment bases
Metal sheet overlaps
Wall-roof junctions
Sealants may shrink, harden, crack, separate, or lose adhesion over time.
Once a gap develops, wind-driven rain can enter the joint and move beneath the roof system.
A proper repair usually requires more than applying new sealant over the old material.
The damaged sealant may need to be removed completely. The joint should then be cleaned, prepared, and filled with a compatible product that can accommodate the expected movement.
Joint dimensions and surrounding materials also matter. A sealant that performs well in one location may not be suitable for another.
6. Defective Roof Flashing
Flashing protects vulnerable transitions where the roof meets walls, parapets, pipes, vents, equipment, or other building components.
Poorly installed, damaged, loose, or corroded flashing can create direct paths for water.
Common warning signs include:
Gaps along flashing edges
Loose metal sections
Failed sealants
Rust
Open overlaps
Water marks below roof-wall connections
Leakage during wind-driven rain
The contractor should inspect the complete flashing detail rather than sealing only the visible gap.
Water may be entering higher up and travelling behind the flashing before appearing indoors.
The repair may involve cleaning, refixing, replacing, resealing, or integrating the flashing with a compatible waterproofing membrane.
7. Metal Roof Fastener and Overlap Leakage
Metal roofs commonly leak around screws, fasteners, sheet overlaps, ridge connections, and flashing details.
Fasteners may become loose because of vibration, thermal movement, ageing washers, or repeated expansion and contraction.
Metal sheet overlaps may also open or lose their seal.
A metal-roof inspection should cover:
Loose screws
Missing fasteners
Damaged washers
Corroded sections
Open sheet overlaps
Failed sealants
Cracked coatings
Loose flashing
Cut edges
Roof penetrations
Rust should be treated before waterproofing materials are applied.
Covering corrosion without proper preparation can trap the problem beneath the coating and reduce adhesion.
The selected repair system should also remain flexible enough to accommodate normal metal movement.
A qualified waterproofing specialist should evaluate whether the problem can be repaired locally or whether a broader protective system is required.
8. Leakage Around Pipes and Roof Penetrations
Pipes, vents, cables, ducts, and equipment supports often pass through roof surfaces.
Each penetration creates a vulnerable connection that must be sealed and integrated with the main waterproofing system.
Leakage can develop when:
Sealants deteriorate
Flashing becomes loose
Pipes move
Openings are poorly formed
Waterproofing layers separate
Repairs are completed with incompatible products
Water collects around the penetration
The contractor should examine the penetration from all sides.
The repair may require removing loose materials, correcting the opening, installing suitable flashing, applying reinforcement, and reconnecting the detail to the surrounding membrane.
Simply adding sealant around the top edge may not stop water that is already entering beneath the existing layer.
9. Parapet Wall Cracks and Seepage
Parapet walls are exposed to sunlight, rain, wind, and temperature changes. Cracks can form on their top surfaces, vertical faces, corners, and connections with the roof slab.
Water may enter through these cracks and travel into upper-floor walls or ceilings.
Common problems include:
Hairline wall cracks
Damaged coping
Failed wall coatings
Open roof-wall joints
Porous masonry
Loose render
Deteriorated sealants
The inspection should include the top, inner face, outer face, and base of the parapet.
A surface coating may help protect compatible areas, but cracks, loose finishes, and failed joints must be repaired first.
Where external access is required, the project should follow appropriate work-at-height safety requirements.
10. Deteriorated Roof Coatings
Protective roof coatings may become thin, brittle, cracked, chalky, or detached after prolonged exposure.
Deterioration may occur because of:
Ultraviolet exposure
Standing water
Poor surface preparation
Incorrect application thickness
Incompatible previous coatings
Trapped moisture
Foot traffic
Ageing
Insufficient curing
Applying a fresh layer over an unstable coating may lead to peeling or blistering.
The contractor should test whether the existing surface is firmly bonded. Loose or weak material should be removed before the new system is installed.
The roof may also require cleaning, crack repair, joint treatment, priming, reinforcement, and controlled application thickness.
This complete preparation supports waterproofing membrane performance.
11. Leakage from Rooftop Equipment Bases
Air-conditioning units, tanks, solar systems, ducts, antennas, and other equipment may be installed on roofs.
Their bases and support points can become vulnerable when:
Mounting bolts penetrate the membrane
Equipment vibration damages sealants
Water collects around supports
Flashing is incomplete
Maintenance work damages the surface
Cables or pipes create open gaps
The contractor should inspect both the equipment base and the surrounding roof system.
Where repairs require coordination with another trade, the work sequence should be planned carefully. Waterproofing should not be completed and then damaged by later equipment work.
Protective detailing around the base can help prevent water from entering through fixing points and connections.
12. Poorly Completed Previous Repairs
Repeated roof leakage often indicates that earlier repairs did not address the full problem.
Common causes of repair failure include:
Treating only the visible drip
Applying material to a dirty surface
Covering unstable coatings
Ignoring drainage defects
Using an incompatible product
Failing to reinforce joints
Sealing the wrong location
Rushing curing time
Repairing one crack while others remain active
Previous patching materials may also redirect water to another area.
Property owners should provide any available repair records, photographs, reports, or warranty documents during the new inspection.
This information can help the contractor understand what has already been attempted and why the leakage may have returned.
How Roof Leakage Is Professionally Diagnosed
Roof leakage diagnosis normally begins with a review of when and where the problem occurs.
The contractor may ask:
Does leakage appear only during rain?
Does it become worse during strong wind?
How long after rainfall does water appear?
Has the stain moved or expanded?
Were repairs completed previously?
Does water remain on the roof?
Are drains regularly maintained?
Is equipment installed near the affected area?
The roof and internal damage are then inspected.
Visual Inspection
A visual assessment can identify cracks, damaged coatings, open joints, blocked drains, corrosion, and signs of ponding.
Moisture Assessment
Moisture readings may help determine whether dampness extends beyond the visible stain.
Controlled Water Testing
Water may be applied to selected roof sections while the area below is monitored.
Testing one section at a time helps isolate the likely entry point.
Drainage Testing
Water flow toward outlets can be observed to identify blockages, low areas, or defective drain connections.
Observation During Rain
Some leaks are strongly affected by wind direction and rainfall intensity. Monitoring the property during natural rain can provide valuable evidence.
Not every project requires every test. The method should match the roof type and suspected defect.
Choosing the Right Roof Waterproofing Method
The repair system should be selected only after the roof condition has been assessed.
Possible options include:
Liquid-Applied Membranes
Liquid systems can form a continuous layer across suitable roof surfaces.
They are useful around detailed shapes and penetrations, but correct application thickness and curing are essential.
Polyurethane Coatings
Polyurethane systems can provide flexible protection on compatible substrates.
Surface moisture, priming, weather, and application conditions must be carefully controlled.
Acrylic Roof Coatings
Acrylic coatings may be suitable for selected exposed surfaces.
They should not be applied over unstable coatings, untreated cracks, or areas where standing water exceeds the product’s intended use.
Cementitious Waterproofing
Cement-based systems may be suitable for compatible concrete surfaces and selected protected applications.
The contractor should consider movement and exposure before choosing this method.
Bituminous Membranes
Bituminous sheet or coating systems may be used for certain roof applications.
Seams, overlaps, edges, penetrations, and terminations require detailed installation.
Crack Injection
Injection may be appropriate for certain concrete cracks and active water pathways.
The chosen material should match the crack condition and repair objective.
Allseal Waterproofing PTE Ltd should be asked to explain why the recommended system suits the roof material, leakage source, drainage condition, and expected exposure.
Why Surface Preparation Is Essential
Successful roof waterproofing depends heavily on preparation.
Before application, the contractor may need to:
Remove loose coatings
Clean dirt and biological growth
Dry the surface
Repair cracks and holes
Treat rust
Remove failed sealants
Prepare joints
Repair damaged screed
Apply a compatible primer
Reinforce drains and penetrations
Even a suitable material can fail when applied to dust, moisture, oil, corrosion, or unstable surfaces.
Preparation should be clearly described in the written scope rather than treated as a minor step.
Testing the Completed Roof Repair
The completed work should be inspected before the project is closed.
Depending on the roof and repair method, checks may include:
Visual inspection
Controlled water testing
Ponding tests
Drainage checks
Membrane-thickness checks
Inspection of joints and penetrations
Moisture monitoring
Observation after rainfall
The contractor should explain which checks are suitable and what they are intended to confirm.
Completion documents may include:
Before-and-after photographs
Areas treated
Materials applied
Inspection findings
Testing observations
Maintenance instructions
Warranty conditions
Allseal Waterproofing PTE Ltd can be asked to provide clear information about the inspection, testing, and documentation process before work begins.
How to Reduce Future Roof Leakage
Regular roof maintenance can help identify minor problems before they become serious.
Property owners and building managers should:
Keep drains and gutters clear
Remove leaves and debris
Inspect joints and sealants
Monitor previous repairs
Check metal fasteners
Look for rust
Report cracks promptly
Avoid damaging membranes
Control access to treated areas
Inspect roofs after severe weather
Keep maintenance records
Follow warranty requirements
Regular inspections are particularly important for flat roofs, metal roofs, equipment areas, drainage outlets, and surfaces with previous leakage.
Choosing a Reliable Contractor
Before hiring a waterproofing specialist, ask clear questions about the diagnosis and proposed repair.
Important questions include:
What is the suspected source of the leakage?
What evidence supports the diagnosis?
Which roof areas will be treated?
What preparation is required?
Which material or system is recommended?
Why is the system suitable?
Will drainage defects be corrected?
How will cracks and joints be treated?
How will the work be tested?
What maintenance is required?
What does the warranty cover?
What documents will be provided?
A professional proposal should explain the scope, exclusions, work sequence, curing requirements, testing process, and maintenance responsibilities.
Conclusion
A qualified waterproofing specialist can resolve cracks, membrane damage, ponding, failed joints, blocked drains, and metal-roof defects. Allseal Waterproofing PTE Ltd can assess the roof, identify likely entry points, and recommend a suitable solution to help prevent recurring leakage and moisture damage.


Top comments (0)